Monday, 9 April 2012

Camera Angles and Techniques

Adding text is a technique we used throughout our film to set the scene’s and show the passing of time. 
Extreme Close Up                
 Long Shot


Over the Shoulder Shot        
Two Shot
Close Up                     

Establishing Shot


Mid Shot                       
Low Angle Shot

Music and Sound Effects

Making our own sounds proved very difficult and didn’t sound profession so in order to get sounds on our film we decided to download them from a website. Before downloading any sounds we emailed the owner of the sound company we would be using to ask their permission. After doing this we were very happy with how the sounds worked with our piece.
Editing in Final Cut Express

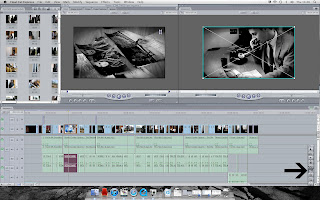
We did all of our editing in Final Cut Express. Here are some of the vital stages of our editing process. If we wanted to make a clip black and white we would select the clip we wanted or in our case if it was the whole movie shift then select the first and last clip. Then by selected effect, video filters, colour correction and then colour corrector. This then enabled us to adjust the level of black and white in our clip. This is a screen shot of the black and white tool. We used this to make the clips in our film into black and white. We used black and white because it is a main convention of film noir and we think it worked well with our clips. To make our clips black and white we dragged the saturation of the clip all the way down to 0. This meant that no colour would be visible in this clip. If the clip was particularly bright or we wanted to make it more shadowed and eerie, we made the contrast higher at this stage which would enhance any shaded areas, making the clip more 'black and white' rather than grey. When editing our film in to black and white we edited each clip individually because we found that each clip had different levels of brightness and if we had used the same level of black and white on all of our clip the brightness and contrast would have changed throughout the clips.  
When we came to edit our clips we had noticed that we had filmed extra either side of the main action. We needed to get rid of this extra footage in order for the clips to link smoothly and make sense. To do this we selected the clip we needed to cut, then clicking the cut tool on the tool bar reselecting the part the start and the end of the clip we wanted to delete. Changing the curser back to the ordinary mouse again, selecting the section to be deleted and then pressing the delete button on the key board. This proved really helpful in the making of our film and helped us distinguish the part in which we need to add transitions.
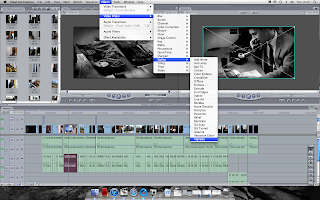
Finally the last thing we did do our clips to make them seem more old fashioned and in keeping with the theme of film noir was add the effect 'Vignette'. This blurred the edges of the clip. We decided that although the black and white effect looked good and worked well fitting in with the conventions of film noir. Our film needed something more than just black and white. We decided to add another effect to our clip. 'Video Filters' allowed us to experiment with different effects. Then we chose one under the section 'Stylize and the filter right at the end called 'Vignette'. As you can see it gives the image a darker edge and looks better.
Final Cut Express

We chose to edit our film in Final Cut Express on the Apple Mac’s. Before we started filming we made sure to read through the ‘beginner’s guide’ by Joel Speed. This proved really helpful when we came to edit because all of the most important editing skills where explained in detail.
INTRODUCTION TO FINAL CUT
Final Cut Express 4.0 is one of the lastest video editing sofeware's available from Apple, it's one of the most advanced pieces of software and with it we can stunning videos. The standard layout consists of the Browser, Timeline, Viewer and Canvas. The browser is where unedited content is stored, when a file is imported it will appear in the browser as a small preview with the clip number and length underneath. Double clicking this clip will allow you to edit it.
The Viewer is where you watch unedited, unrendered footage.

The Canvas is where you can play back your edited clips from the Timeline. You can drag and drop the curser to the place you want to view the video from. You can also arrange clips by scaling and moving them. The Timeline is where you assemble your video. Video clips are shown in blue and audio clips are shown in green. You can arrange the clip simply by dragging and dropping them into the suitable place. You can also cut and trim clips within the timeline.

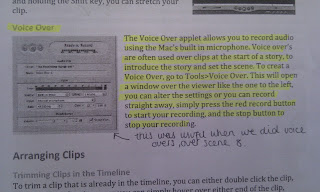
The Voice Over applet allows you to record audio using the Mac’s built in microphone. Voice overs are often used over clips at the start of a story, but in our case we used this tool to add the voice of Martha and Clark reading the Draft that is posted through Nancy's door.
Once you have recorded your voice over you can import the sound clip straight into your timeline and edit as needed.


Sunday, 8 April 2012

Props and Costumes

 
After the final screenplay had been completed we made a props and costume list for ourselves. The ideas for character's and set had been finalised which meant we could go into a lot more detail on how we wanted the sets to appear and how each individual character should look and come across to an audience at certain times within the film. The kitchen scene - For this scene we needed to make sure there was no modern props around. This scene was between Martha and Clark before Clark leaves for breakfast.  A simple plain white teapot cup and plate made this scene complete. After watching pervious Film Noir we noticed that a lot of them had posh looking glasses to hold their whiskey. We found one of these for our film and used them in Clark's office and Nancy's house to show their status, as the poor wouldn't have one.

We definitely need newspaper’s in the office scene so we created our own documents and took our own picture's and edited them to make them appear old. This was a vital part of the film. The microflex camera was just for effect and wasn't actually used during filming but we thought it was a nice touch and fit in well with the time period. Finally the circular dial telephone was a very important prop within our film and appeared in Clark's office when he is on the phone and also in Nancy's house. Clothing was just as important as props in our film and we took a lot of time researching and planning the suitable clothing for each character. On the left are Martha's clothes and on the right are Nancy's clothes. We wanted Nancy's character to automatically be seemed as the femme fatale of our film so we dressed her in glamorous, sparkly dresses and big fur coats, and in contrast Martha was the middle class housewife, so we dressed her in more casual clothing.

 As you can see from the picture’s neither of the women have red or white seductive clothing suggesting they are the femme fatale. We purposely did this. Instead we picked a neutral colour like blue. Both women had two blue dresses that they wore in the day time, one black dress for their formal event and a coat with fur. We did this so the audience wouldn't distinguish a femme fatale from the very start of the film. This we hoped to cause the audience to dig deep into each character making their own opinion rather than having it handed to them; because it turns out that both women are femme fatales in our film.

Locations for Blackmail

It was important that we thought about the locations of our film and all agreed on where would be most suitable. We had to take into consideration the times of day would be using certain locations, the availability and using the equipment safely. At first most of our suggestion wouldn’t fit in with the times we would be available to film and we didn’t want to have to rely on other people, so we came to the conclusion that using our own houses would work a lot better as we could film any time we wanted and take as long as we needed. We used three different house for our film, along with an office at school and the main hall for the premiere.
The pictures on the left are where we shot the scenes for Nancy's house. We picked this house in particular for Nancy's house because the front of the house opened up on to vast fields, which allowed us lots of room for film and also creating large establishing shot and deep shots from within the house. The front door had patterned glass which would create an interesting shadow effect on the actor’s faces when placed in a certain position.


These pictures in particular show the establishing shot and deep shot we were able to capture while filming. The house had a big drive way which allowed us to film long shots of Clark and Martha walking to Nancy's house. The wall at the front of the was perfect for scene seven, were Martha posts the newspaper draft through Nancy's front door. Having such an open space to work with also allowed us to play around with the camera angles a bit. Some of our tracking shits turned into a canted angle shot - a typical convention of film noir.


We filmed the scene in the living room at Nancy's because it gave us a great opportunity to get a really good depth of field, deep shot through the window. It also meant that the viewer had a clear view of Martha, which would have been difficult if the filming had been in any other room.
We had to make sure the decor of this room was very simplistic. Having modern day furniture would have taking the audience out of the story and made them focus on the unusual props, so when we filmed in this room we had to be very careful where we placed the camera.


This is the house we used for Martha and Clark's house. We decided to use this house in particular because of the kitchen. This was the closest we could get to a '1950's' styled kitchen. On the picture to the left is marked some changes we had to make to the room to make the set more believable. Modern day toasters, dishwasher’s, microwaves and Tesco bag's would have been around during the time in which our film was taking place so we had to remove them from the frame or be very careful where we were filming.
Having a window at the top of the stairs allowed us to experiment with different lightings and shadows. On sunny days the shadows of the venetian blinds would show on the wall, which would work really well and keep in the theme and using the conventions of film noir.
The front door was probably the hardest set of this house as it didn't resemble a typical 1950's door, but as this wasn't a major part in our film it didn't matter so much. However the diamond, frosted glass in black and white created a nice effect once edited.
This set with the venetian blinds was meant to be in Martha's living room. However it isn’t the same house as we used for Martha's original house. We changed the house because venetian blinds are in my eye's the most important convention of film noir and if we hadn't included them in our film the genre wouldn't of been as clear as it could. We had to make sure the editing was perfect at this point in the film so the audience wouldn't know it the scene was taken in a different house, and so the scene flowed nicely from one to another. The venetian blinds create an eerie effect upon a character making you double think your opinion on them.

Clark’s work office is the final set we used. This was used of scenes when Clark was alone working, or with Nancy. The small modern office had quite a transformation, as we couldn’t have any computers, modern telephones, or posters in the shot.
Clark’s work office is the final set we used. This was used of scenes when Clark was alone working, or with Nancy. The small modern office had quite a transformation, as we couldn’t have any computers, modern telephones, or posters in the shot. This space was rather hard to work in as it was very compact and it was often difficult to capture long shots of the action happening. We often used the tripod but for this set in particular we found that holding the camera worked better as we could maneuverer at lot easily.

Character Profiles - Question and Answer Interviews

Here is a short video of a question and answer session on our characters.